Polling ethernet info from Windows using Zabbix

Effing Windows keeps crawling onto my life, no matter what I do...
Today at work we incorporated the first Windows server to production duties, it is dedicated server, with a hosting company in the ole US of A.
For websites, the company
Ok, the occasion was rather good to test a bit the monitoring side of Windows,(even more than here).
On that particular site, I have setup my favorite complex monitoring and trending solution, Zabbix, so after installing the Zabbix Agent on the Windows 2003 Server, (with SP2 installed), used one of the templates on the Zabbix server, they are an amazing way of getting all sorts of data right away, without having to spend a lot of time configuring things.
The thing I noticed is that they were no stats for the Ethernet interface at all, that seemed really strange since that particular information is basically one of the most important, if not the most important information you can poll remotely from a server.
On the Windows box, add this to the bottom of the 'zabbix_agentd.conf' file:
PerfCounter = NetOut,"\Network Interface(Broadcom NetXtreme Gigabit Ethernet)\Bytes Sent/sec",60
PerfCounter = NetIn,"\Network Interface(Broadcom NetXtreme Gigabit Ethernet)\Bytes Received/sec",60
Replace 'Broadcom NetXtreme Gigabit Ethernet' with the one that your Windows box has! You can get the value running 'ipconfig /all' on a CMD window on the Windows box; it's the "Description" field.
Once you did that, restart the "Zabbix Win32 Service", and move onto the Linux server that runs the Zabbix server.
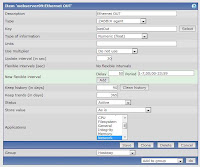
Login to the Zabbix's webfront, as an administrator, goto 'Configuration' -> 'Items', select you Windows Zabbix monitored box from the drop down, and then, 'Create item', and take a look at the screen shot to get the values for each field. You'll need to create one Item for the 'NetOut' and another for the 'NetIn'.
Once you save both Items, you are done, you'll begin to get information from the NIC on the Windows box.
Labels: Linux, Network monitoring, Windows


6 Comments:
Hello. This post is likeable, and your blog is very interesting, congratulations :-). I will add in my blogroll =). If possible gives a last there on my blog, it is about the Fragmentadora de Papel, I hope you enjoy. The address is http://fragmentadora-de-papel.blogspot.com. A hug.
Your blog keeps getting better and better! Your older articles are not as good as newer ones you have a lot more creativity and originality now keep it up!
It is not my blog, it is you the one getting better and better.
This comment has been removed by a blog administrator.
This comment has been removed by a blog administrator.
This comment has been removed by a blog administrator.
Post a Comment
<< Home